

Important disclaimer
The information in this article is provided for general guidance only. Follow these troubleshooting steps at your own risk. PC Ninja is not responsible for data loss, software problems, system damage, or other issues that may result. Back up your QuickBooks company file and other important data before making changes, and contact a qualified professional if you are unsure about any step.
Before you troubleshoot
Confirm that Adobe Acrobat Reader is installed and set as the default PDF app. Then work through the fixes below in order, testing QuickBooks after each one.
What the error means
QuickBooks Desktop is usually failing to build the invoice PDF before handing it to your email program. Windows updates can disable Microsoft XPS Document Writer, which QuickBooks still uses during that process.
Close QuickBooks before you begin. Work through the fixes below in order. After each repair, reopen QuickBooks and test the invoice. If it works, you can stop.
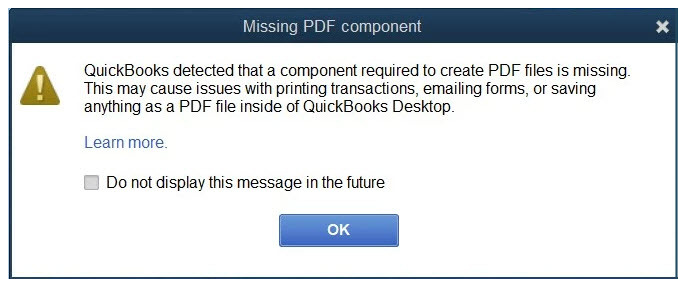
You May See One of Two Error Messages
QuickBooks Desktop can display this PDF-component problem in two different ways. The wording may differ, but both messages usually point to the same damaged or unavailable PDF and printing components:


Use Adobe Reader for QuickBooks PDFs
Install the latest version of Adobe Acrobat Reader so you can reliably open, view, and print PDFs created through QuickBooks, including checks, deposit slips, and invoices.
Download Adobe Acrobat Reader from Adobe, install it, and set it as the default Windows app for PDF files before continuing.
Check Your QuickBooks Version on Windows 11
Check your QuickBooks year before continuing. An unsupported version may be the reason the error keeps returning.
There may be a point where troubleshooting cannot fully resolve the problem because an older QuickBooks release is not officially supported on Windows 11.
QuickBooks Desktop 2024 / Enterprise 24.0 and newer
Fully optimized and supported for a native 64-bit installation of Windows 11.
QuickBooks Desktop 2023 / Enterprise 23.0
Fully compatible with 64-bit Windows 11.
QuickBooks Desktop 2022, Release R3 or later
Officially supports Windows 11.
QuickBooks Desktop 2021 and earlier — not officially supported
These editions were built for Windows 10 or earlier and are not officially supported by Intuit on Windows 11.
An older edition may still install and appear to work, but compatibility issues can cause unresolved bugs, PDF or printing errors, multi-user and network problems, or security risks. If the repairs below do not help, upgrading QuickBooks may be more effective than continuing to troubleshoot an unsupported version.
Turn Microsoft XPS Document Writer Back On
This is the most common fix, especially on Windows 11. Complete these steps, restart Windows, and test QuickBooks before moving to section 2.
- 1Press Windows key + R, type optionalfeatures, and press Enter.
- 2Find Microsoft XPS Document Writer and check the box.
- 3If it is already checked, uncheck it, select OK, reopen Windows Features, and check it again.
- 4Confirm that .NET Framework 3.5 and .NET Framework 4.8 Advanced Services are also checked.
- 5Select OK, restart your computer, and allow Windows to finish applying the changes.
- 6Open QuickBooks as an administrator once, then try emailing a test invoice.
Run Intuit’s PDF Repair Tool
- 1Open Intuit’s official QuickBooks Desktop Tool Hub instructions and download the latest version.
- 2Open Tool Hub and select Program Problems.
- 3Run the QuickBooks PDF & Print Repair Tool.
- 4Let the repair finish, reopen QuickBooks, and try emailing a test invoice again. If it works, stop here.
Test Save as PDF
Open the same invoice and select File → Save as PDF. This test identifies which part of the process is still failing:
Save as PDF fails
The problem is still in the Windows or QuickBooks PDF system. Continue to section 4.
Save as PDF works
The PDF system is working. Skip to section 5 and troubleshoot the email connection.
If Save as PDF Fails
The problem is still affecting PDF creation. Complete these additional repairs one at a time, then test Save as PDF again.
- 1If Adobe Reader is already installed, repair or reinstall it and confirm it is the default application for PDF files.
- 2Update QuickBooks Desktop through Help → Update QuickBooks Desktop.
- 3Advanced: In File Explorer, enter %TEMP% in the address bar. If QuickBooks cannot write to this folder, open the Temp folder’s Properties → Security and verify that your Windows account has Modify and Write permissions. Change permissions only if they are missing, do not grant Full Control to Everyone, and ask a qualified technician for help if you are unsure.
- 4Run the XPS and QuickBooks PDF repair steps again, then test the invoice in a QuickBooks sample company file if one is available.
If Save as PDF Works but Email Still Fails
If the invoice saves as a PDF without any trouble, the PDF system is fine and the issue is limited to how QuickBooks hands that PDF to your email program. In QuickBooks Desktop, go to Edit → Preferences → Send Forms → My Preferences and work through these checks:
- 1Choose Outlook if you use the desktop Outlook application, or choose Web Mail for a supported webmail account.
- 2In Windows, open Settings → Apps → Default apps and set your preferred mail application as the default email client.
- 3Confirm the customer has a valid, correctly formatted email address saved on the invoice.
- 4If you use Outlook, close QuickBooks, set Outlook as the Windows default mail app, and run an Office Quick Repair through Settings → Apps → Office → Modify → Quick Repair.
- 5If Outlook still fails, switch the QuickBooks send method to Web Mail and test again.
Try Web Mail if Outlook still fails
If QuickBooks can save the invoice as a PDF but Outlook will not send it, try configuring Web Mail in QuickBooks. Availability and setup options depend on your QuickBooks version and email provider.
Last-Resort Workaround
If you need the invoice out right now, save it as a PDF and attach it yourself in Outlook or Gmail. It is not an elegant fix, but it lets you bill the customer while you keep working on the underlying repair.
Still stuck? Here’s what to have ready
Before contacting QuickBooks Support or a repair technician, note your Windows version, QuickBooks Desktop year, whether Save as PDF works, and whether the issue also occurs in a sample company file. These details help identify whether the problem is tied to Windows, QuickBooks, email settings, or your company file.
Need hands-on help?
If you would rather have someone handle the remaining troubleshooting, contact a local computer repair shop or PC Ninja for remote support.